|
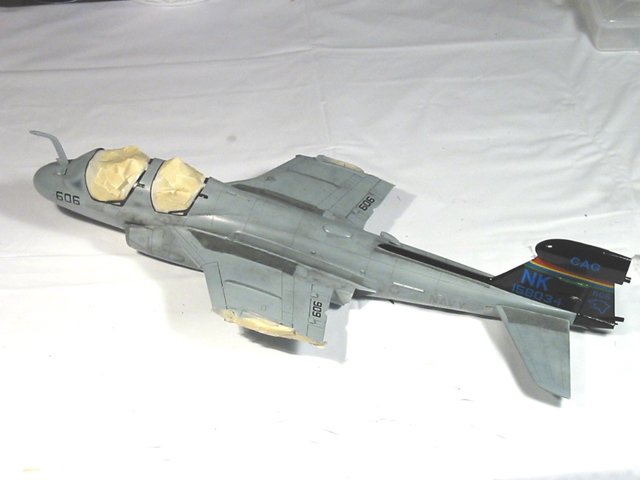
Many modifications
were made to my 1/48 Prowler to improve its accuracy and overall appearance.
Also, a number of aftermarket detail sets were used in building the jet. These
include Cutting Edge’s EA-6B Corrections Set, Wing Fold set, and a Black Box
cockpit. These aftermarket sets help a great deal in creating a more realistic
looking EA-6B.
Before any
construction began, all panel lines were re-scribed, and in the process,
adjustments were made where necessary. This process was done using Dymo adhesive
tape and the sharp, metal tip of a compass chucked into a pin vise. While I’m
sure the panel lines are not 100% accurate, overall, I believe they are much
more accurate now than the raised ones that were molded into the kit.
I moved the small,
rectangular vent (located on the starboard side above the wing’s leading edge)
back to its correct position which mirrors the port side vent.
Next, the vertical
tail’s forward spine was cut away from each fuselage half to make room for the
resin replacement included in the Cutting Edge correction set.
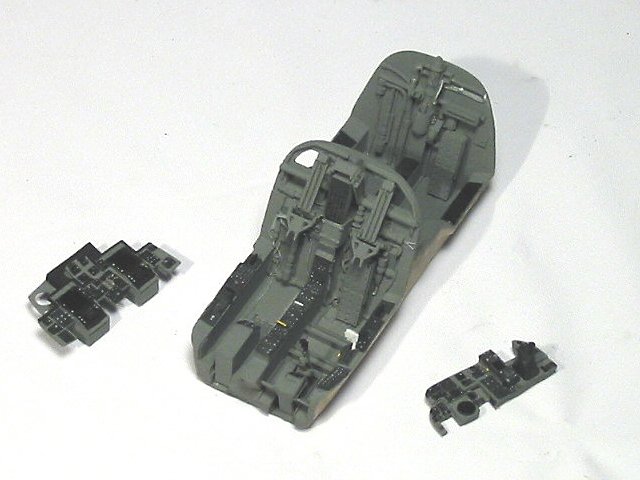
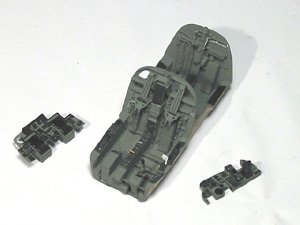
Continuing on ,
the cockpit was built-up using the Black Box instructions along with photos of
the real jet. The cockpit exterior was ground to a shape similar to the cockpit
tub provided in the kit and was test-fitted to the fuselage halves. Once a good
fit was achieved, the resin tub was airbrushed using Model Master Dark Gull Gray
and hand painted with Interior Black. Knobs, switches and other fine details
were painted using a sharpened toothpick as a paint applicator while referencing
pictures of the actual jet’s cockpit.
After the cockpit
was set aside, I removed the armor plating from the underside of both fuselage
halves and from under the vertical tail. The initial grinding was done with a
Dremel tool and sanding drum, then several grits of wet-dry sandpaper were used
to clean up the work and smooth everything out.
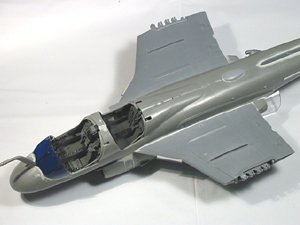
Finally, I was ready
to begin the construction process of the fuselage. The cockpit tub, nose gear
bay, and the tailhook bay ware mated to one of the fuselage halves. I used
Superglue on the tub and cement on the tailhook bay. Once these items were
secure, the jet was closed up. Tons of rubber bands were used for clamping as
the glue that held the fuselage dried. No additional weight was needed to keep
the jet on its nose. The cockpit tub is really heavy and serves as a perfect
nose weight.
Once the glue
holding the fuselage dried, four small, curved drain tubes were added to the
underside of the fuselage, along with a V-shaped oil deflector made from sheet
styrene. The drains were inserted into pre-drilled holes I created to give them
some strength. At the same time, slime-lights were created from sheet stock and
added to both sides of the jet.
The refueling probe
had already broken away from the fuselage while the kit was packed away on the
shelf. At this point in construction, it was reattached to the fuselage at the
correct angle which is about 11 degrees toward the starboard side rather than
the port side as molded. I then added a scratch-built rain remover and the kit
provided refueling light under the pilot’s side of the windscreen.
Next, the inner
wings were built-up using the Cutting Edge instructions provided with the
wingfold set. To complicate things, the kit-molded exhaust parts were ground off
and the areas completely reworked to accept new exhausts made from brass tubing.
Once built-up, these sub-assemblies were added to the fuselage and puttied in.
At about this same time, the rear horizontal stabilizers and resin vertical tail
forward spine were also added to the kit. Several rounds of putty and sanding
were needed on the spine to achieve smooth look.
|
Click on
images below to see larger images
|
|
|
|
I was getting close to finishing
the major construction work on the fuselage so it was time to add the intakes,
various scoops and other fine details. The only items not added to the fuselage
before painting the model were the antennas. These were to be added at the very
end to ensure they didn’t break off while handling the jet.
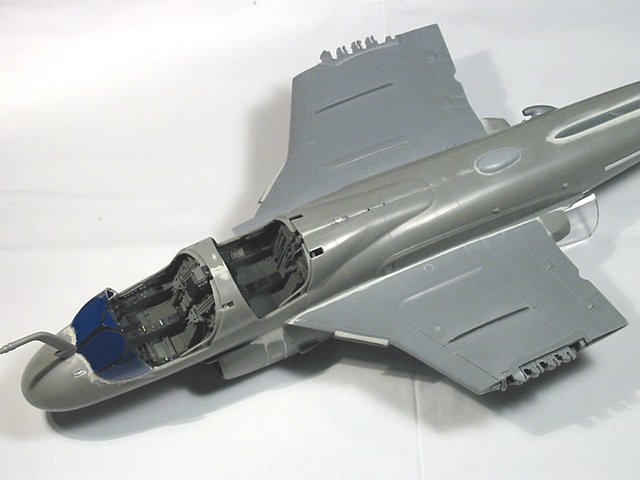
Next, I took some time to prepare
the windscreen for attachment to the jet by tinting the forward-facing windows
with Testor’s Acrylic Clear Blue mixed with Future Floor Wax.
Now, all the important parts of
the fuselage were in place. All sub-assemblies were prepped and also ready for
the paint shop. The next step was to glue the poor-fitting windscreen into
position, putty it in, and then mask the cockpit in preparation for painting.
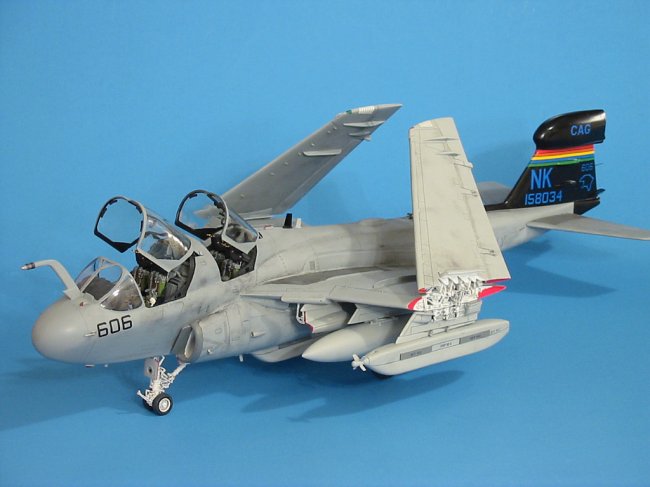
All exterior camouflage was done
using a Badger 150 airbrush with a fine tip for detail work, and a medium for
all other general painting. All painting was done using Testor’s enamels.
Model Master FS 36375 was applied to the exterior lower surfaces and a custom
mix of approximately FS 36320 was used on all upper surfaces (this color was
lightened a bit to simulate fading). Next, fine lines of FS 36320 and FS 35237
were sprayed onto panel lines here and there to simulate maintenance touch-ups.
The tail was airbrushed using heavily thinned Model Master Gloss Black for an
ultra-smooth finish.
Walkways were created by masking
the jet and airbrushing Dark Gull Gray paint. Cinnamon powder was ground into
the wet paint several times and then a final, fresh coat of Dark Gull Gray was
applied to hide the reddish tint of the powder. This created a nice textured
look for the walkways.
After all the exterior colors had
been applied and were dry, I added two coats of Model Master Metalizer Sealer as
a gloss coat in preparation for decaling. I do not like to use Future at this
stage, because MicroSol and MicroSet tend to eat into it when applied too
heavily. Applying a lacquer-based clear instead of Future (which is acrylic)
seems to solve this problem.
Decaling alone took me a couple
weeks to complete. There were problems with the CAM decals that I was not fully
prepared for. All of the blue decal included on the CAM sheet were printed out
of register and when initially placed on the model, looked terrible. The white
undercoat which keeps the blue looking sharp when applied to a dark surface was
peeking out from behind all of the tail markings. After pondering this problem
for a while, I decided to correct it by creating “reverse font” decals in
Illustrator and printing them in black on my ALPS printer. These new decals went
on over the blue, hid all of the white, and blended perfectly with the black
tail. With this correction, the blue tail markings finally looked right.
Another problem with the CAM
sheet was the fact that the two “606” decals for the upper flaps were
oversized and would not fit on the model. I made a couple replacements again
using my ALPS printer, reducing the original markings to about 85% in size.
These fit well and went on flawlessly.
The final problem encountered was
that the intake warning markings provided were oversized and would not allow
room for the rescues arrows to fit into place. Each intake warning was carefully
cut, trimmed down in length, and then applied to the model in three separate
pieces. This wasn’t the easiest thing to do but once the work was done and the
decals were on, it was worth it. Without modifying these decals, there is no way
to get the rescue warning markings on in the correct position.
The tail stripes were placed over
some very irregular surfaces and had to be touched up in places. This was done
using a 15/0 brush. Once the tail was sealed, the touch-up work blended
perfectly with the decals.
Finally after all the decaling
was complete, I masked off the tail using clear plastic wrap and sprayed the
rest of the model with Testor’s Dullcote. Once this was dry, I carefully
masked around the tail, and shot it with a thin layer of Testor’s Simi-Gloss.
This did not tame the intense shine down as much as I had liked, so I added a
very thin layer of Dullcote. That did the trick and I’m loving the finish on
the tail.
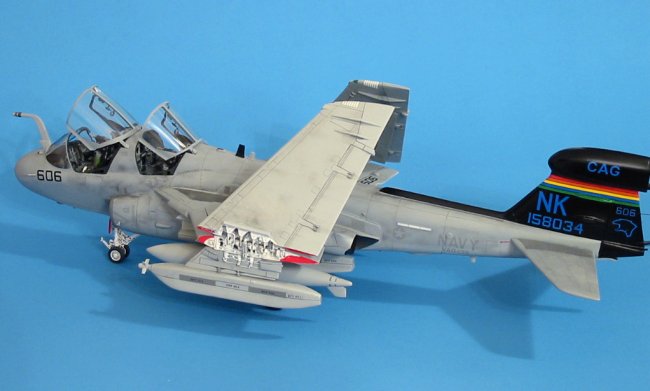
All the really hard work was now
complete. I proceeded to add the rest of the details which included landing
gear, wheels, outer wings, pylons, pods and antennas. The AGM-88 HARM missile
and launcher was taken from a Hasegawa F-16CJ kit since these are the best
88’s I’ve found in 1/48 scale. I created a full set of custom decals for the
HARM using my ALPS printer.
Finalizing the model continued,
as antennas were added to the trailing edge of the vertical tail using .009
electric guitar string inserted into pre-drilled holes. Both pitot tubes were
filed down considerably and painted Steel before being added to the fuselage.
This gave them a slightly more delicate appearance and although they still are a
bit oversized, they look a bit more to scale. Also at this time, the ejection
seats were painted, washed, decaled with custom markings, and then dropped into
the cockpit tub.
At this point everything was on
the jet except for the two canopies. Several small but important modifications
were made to both of them. Scratch-built details were created from styrene stock
and fine copper wire and attached using Micro Crystal Clear adhesive. The canopy
hinges had already been cut off and replaced with styrene tabs prior to
painting. These new arms were resized and shifted in position to match the
mating fuselage cutouts I created.
The last evening of construction
was spent adding aftermarket mirrors to the canopies, and gluing a small styrene
hinge door to the base of each canopy arm as seen on the real jet.
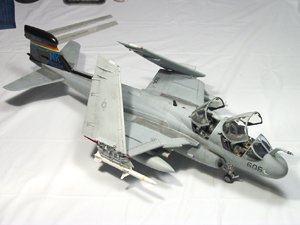
Although there were a
mind-numbing amount of inaccuracies and general problem areas to contend with,
overall, this was an enjoyable build. I spent well over 140 hours on this jet
bit I really wanted an accurate 1/48 Prowler to add to my display case. Photos
of an EA-6B I shot at the 2002 Dayton Air Show were a big help as were the
Detail & Scale reference book, and the hundreds of digital images I found
while searching the internet.
Marv
|
Click on
images below to see larger images
|
|

|
|
|