|
I am aware this kit has been
around for several years, but this is the first time I've completed one, so I
thought folks might like to know my opinion of the kit. I've included some pics,
so you might judge for yourself. The kit is typically Tamiya, in that the
moldings are nice and crisp, dimple and press marks free. Cast in light gray
plastic, Tamiya provides you with engraved panel detail, sufficiently deep for
your enhancement techniques to take effect. The clear parts are crystal clear, devoid
of blemishes, and thin enough to look right, but not so much as to be
fragile. A drop tank is provided as the only ordinance. Two sets of cooling
gills are providing, so that you can display them either open or closed. The
decal sheet is adequate, and provides markings for 2 different planes. I might
mention that this kit was developed from their earlier FW-190F-8, and as such
includes a few extraneous parts, such as a radial engine front. Tamiya's kit
isn't perfect, as it provides a fully walled gear well, but the original well
was opened at the inner front, exposing some of the engine bottom to view from
the outside. It has been said that the gear legs are not sufficiently long
enough and I agree, they just do not look right. Might be another 1/16th inch
could make the difference. All this having been said, the kit goes together
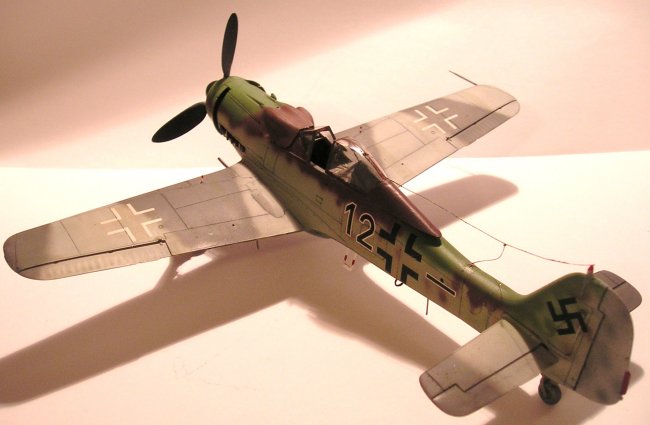
exceptionally well, with no filling required. For my build, I added scratch
built seat belts and buckles, brake lines, visual gear indicators, and the
dorsal antenna beneath the rear fuselage. My cannon are vinyl
covered paper clips, while the navigation lights are MV model train lenses. Note
the slack antenna cable, blown hood FW-190 variants had no tensioning devices,
so the antenna cable would sag when the canopy was opened.
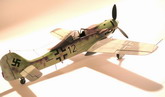
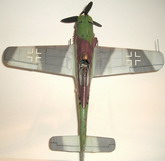
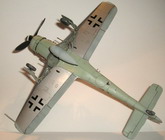
Click on
images below to see larger images
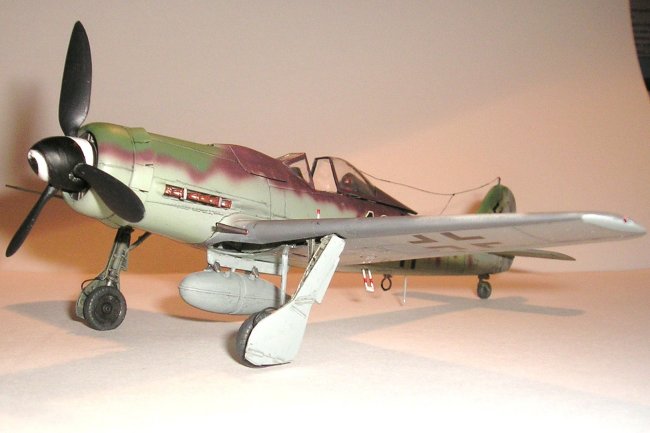
How about the finish I
applied. Well, all paints are Model Master Enamels, RLM numbers 63,76, 75, 82
(bottled as 83), and 81, plus non buffable aluminum. I added a smidgeon of red
to the 81 to add to the violet tint, and a touch of 82 to the 76 for the
"84" (not a proven RLM color, but used in sufficient amounts that
modelers have given it a spurious RLM number, I suppose for identification
purposes.) I found a piece of artwork on the net of this scheme, and found it so
attractive I had to reproduce it. The airplane is purported to be that of Lt.
Theo Nibel of Jg-54, during Operation Bodenplat, 01 Jan, 45. Nibel's Focke was
brought down while strafing at low level, by a partridge strike in the radiator.
I did the fuselage and fin with the "84", the rudder in 76 mottled
with 75. Upper wing surfaces are 63 with disruptive bands of 75. The
fuselage upper decking is 82 and 81, with mottling of both on fuselage sides and fin.
What about the bottom? I must admit that here I am extemporising, not actually
knowing what the real undersides looked like. What I've done is applied an
"educated guess", knowing that many langnasen in the last few months
of the war were done just so. Leading edges 75, main panel unpainted aluminum,
wing caps, gear covers, and control surfaces in 76. Now you may ask, "Why
would an airplane be such a mishmash of uncoordinated colors?" Simply put,
by late 1944, allied bombing had forced the building halls underground, into
tunnels, and such. All supplies, including paints, were in very short supply,
and the ground transportation system was hectic at best. Many sub assemblies
were being made in barns and garages by unskilled labor, who might not have
access to the latest paints, and were working with crude equipment. The wonder
is, how under such dire circumstances, were the Germans able to produce so many
machines?
In any event,
here's my version of Tamiya's 1/48th scale FW-190D-9, hope you like it.
Have fun,
Hal Marshman Sr.
|
|