|
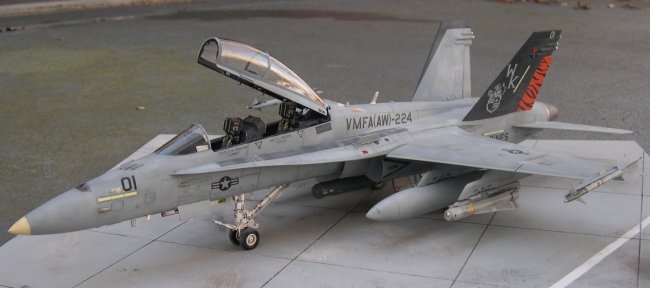
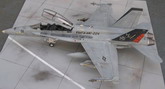
This is the big Academy Hornet.
I completed this build quite a while ago but am only now getting around to writing this build review.
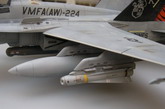
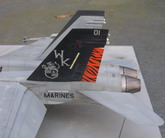
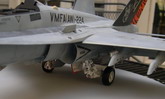
The subject is a Marine Corps F/A-18D of VMFA-224, with the beautifully marked black tails and tiger-striped rudders.
Critically for me, since I like to build subjects that are or were used operationally, VMFA-224 certainly did take this particular airframe in this livery to OIF, and my choice of ordinance reflects a typical OIF load-out.
Click on
images below to see larger images
COCKPIT: I wanted to show some faster progress with this build and hence chose not to use any resin aftermarket detail sets for the cockpit, although I did quite a bit of cockpit scratch-building, including the HUD, main instrument coaming, and quite a bit of tubing and wiring here and there. The CRT’s screens were crafted from photo-film. I did use Eduard’s placard and photo etch set to add a little bit of color and detail. Incidentally, the kit has the correct, stepped rear cockpit instrument coaming which pertains to a “D”, this is sometimes created incorrectly in kit and aftermarket sets.
I used resin SJU-17 seats to replace the kits SJU-5’s, since my airframe is a later-lot bird. The sets were great and I added detail using lead foil, guitar string for oxygen hoses and more Eduard placards.
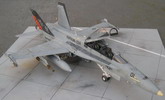
FUSELARGE & WINGS: I strengthened the wings a little by supergluing in some wire. I did not use any resin seamless intakes, since I was able to glue and sand the existing ones fairly well. Unfortunately, the D-mold resin intakes were not available when I built the kit, so my intakes still have the throttled appearance of the kit intakes, which is of course entirely unrealistic.
EXHAUSTS: I initially wanted to use the Aires exhausts, since they have really nice interior details. However, they are very noticeably too small and they also lack the slight convex shape of the real thing. I therefore ended up using the Black Box exhausts, which I think look quite nice.
MISSILES: The Cutting Edge Winders were used in conjunction with Two Bobs decals. I absolutely love the CE range of missiles and am very relieved that Zacto is relieving my thirst for thin winged, highly detailed missiles. The AGM-65E laser Mav’s are an amalgamation of the kit missile body with CAM flying surfaces, since the CAM wings are marginally thinner—but only marginally, I still sanded down the leading and trailing edges to make things look a little better. I also used a small reflective foil ring I found lying around to simulate the guidance section behind the lens.
BOMBS & PODS: The Litening pod is from Wolfpack. For the GBU-12 I used an Australian resin set for the nose and tail section, and mated these onto Mk82 bodies taken from the kit (the resin set bomb bodies were under sized). I spray painted the bomb bodies with Rust-Oleum textured paint to simulate the flame resistant coating on these bombs, after which I applied paint and decals as usual—well, the decals had to be applied with loads of Future to make them conform to the texture. The bomb body also received a very flat final coat, whereas the guidance sections were finished in semi-gloss. The rust effects were simulated using Testors “rust”, which was hand-brush applied in vertical streaks.
PAINTING, DECALING ETC. The main premise of my weathering was to recreate the faded and uneven look apparent on Marine OIF aircraft. I used a variety of grays applied to different panels and areas to give a patchy appearance. Much of this was also hand brushed, with only a very small amount of paint on the brush. This results in a more hard demarcation, which I think looks more realistic on some panels.
I tried a new technique with respect to the walkways: Since there are really rough on the real thing, I masked these off and sprayed the area with Rust-Oleum textured paint, and then over sprayed that with dark gray. Finally, I sprayed with some different shades of gray to also provide a weathered appearance to the walkways.
I used Promodeller to apply the wash—I absolutely love that product! The model was then coated with Future before decal application. The decals were from MAW and were excellent. The MAW guys also include a CD with pics of the real thing with the sheet, which was very helpful.
WHEEL WELLS / LANDING GEAR. I used the SAC main gear set and added some bits and pieces as well as Eduard placards to create more realism. The final little extra that I always do on the tires is to apply some white pastel onto the tire surface that would be in contact with the tarmac.
Unfortunately, I only found out after completion of the model that the front gear tends to be a little too long, giving the finished model a slight tail-sitting appearance. I didn’t have the heart to tear things apart to correct this mistake.
Marcel Hohl
Click on
images below to see larger images
|
|
 USMC Birthday 2010