|
Koolhoven FK58C.1
History
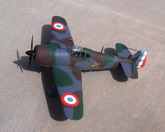
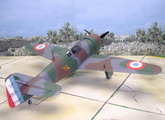
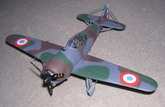
Designed by Eric Schatski, formerly of Fokker Company the FK58 was a single seat low wing monoplane fighter of mixed construction. It was designed in great haste to meet a great requirement for a fighter to operate in Indo-China. The prototype flew for the first time on 17th July 1938; only three months after the first drawings had been made. A robust unattractive aircraft, the FK58 had an enclosed cockpit for a single seater with a rearwards sliding canopy, inward retracting main landing gear units and a strut bared tail plane. The fighter was manufactured by N.V.Koolhoven Vliegtuiegen, Waalhaven, Rotterdam. The prototype was shown for the first time at the Paris Air Show in November 1938. The type was accepted by the Dutch Army Air Service and production commenced during 1939.
Prior to the beginning of WWII, domestic manufacture in France was not sufficient to equip the Armee’ de l’Air with modern fighters and it decided to purchase the FK.58. It was intended to be a cheap, high performance fighter of composite construction. When displayed in France the aircraft was regarded as the fastest fighter in the world. The French placed an order for 50 aircraft, but the type flew only about 47 operational sorties. After the armistice all the aircraft were scrapped.
Click on
images below to see larger images
The model
Kit: Koolhoven FK.58C.1
Catalogue No: PLT179
Scale: 1/48
Price: £42.85
Type: a resin kit with one unidentified French aircraft.
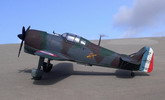
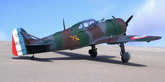
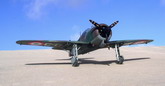
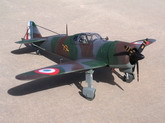
The Planet model of the FK58 is titled as the FK58C.1. It has 67 cream coloured resin pieces and two clear vac-form canopies with raised framing. There is a 4-page A4 size instruction sheet containing eight stages of assembly on two sides, and history and colour detail on the other two. A good decal sheet with French roundels in good register is included for one aircraft. The resin parts are fine, with engraved panel lines and are pore free. Resin kits generally contain heavy moulded blocks that serve as efficient feeding heads to produce sound thick sections free from shrinkage and other defects.
Construction
For a change I am altering to a 1/48 scale model and in this case makes it the largest resin kit I have ever made. Being a bigger scale than what I normally do there will be more detail into it and this should prove to be an interesting and a not so common subject too.
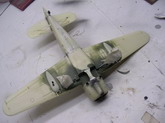
Great care is needed when separating the parts from the thick runners, using a fine saw. Care is always required especially when cleaning the intricate fine parts like the gun sight, seat, undercarriage and several other small items to avoid damage. The kit contains a detailed radial engine. This is broken down into single cylinders for which there are five spares. The fuselage parts have delicately moulded surface detail including ribbing and canvas texture. Some cleaning of the mating edges was needed in order to produce a perfect fit all around the fuselage sections. The same was required on the leading edges of the single piece wing part. These were smoothened with wet and dry sanding. The engine cylinders needed sanding down in overall height before fitting to the central engine body. Once reduced and built into a two-row radial engine, the unit fits inside a one piece cowling part without problems. It should fit deeply enough that only the central pin for the spinner should protrudes from the cowling front. The parts are fixed using super glue and the rear engine bulkhead is inserted at the rear of the cowling. To complete the engine/cowling subassembly, two circular and one oval flat intake are placed on the upper half of the engine front.
The next stage assembles the cockpit interior, which consists of a cockpit floor, two cockpit side panels and interior stiffeners fitted to the rear of the seat. These are thin resin strips, and four fine crossbars were added from scratch built pieces of Contrail rod. Drilling a small locating hole in each side of the fuselage will simplify matters when it comes to fixing these in place. They are glued to one half and when the two halves are joined together the cross bars are fixed at the other end as well. The cockpit interior was painted cockpit green and all the other details fitted to the sidewalls. The instrument panel, control column, rudder pedals, seat, etc, were all painted according to the instructions. At this stage the fuselage halves were joined together.
The main planes came as one piece and also show fine engraved panel lines. In my example one side of the wing was slightly warped, but I managed to straighten it without any effort by immersing it in warm water. It was then bent gently to the required final shape. The next stage involved fitting the lower fuselage detail parts. This included a long intake duct under the cowling, the undercarriage legs, and wheel well doors, and ‘L’ shaped cockpit access step. Two-underwing gun pods have rectangular slots that needed cleaning. The pods were drilled at the forward ends to take the gun barrels and were then painted black inside. They were fitted under the wings at the locations faintly marked on the wing parts.
The main wheels also exhibit detail and care is needed to separate them from their moulding blocks. They have ‘flats’ to be assembled in contact with the ground and the tyre sides bulges to simulate the weight of the aircraft. In order to ensure that the flats touch the ground when the model is sitting on its wheels, the wheels had a shaft inserted into them and holes drilled into oleos. The model was then placed on its wheels and once the flat position was touching, as it should, a tiny amount of super glue was added to fix the assembly. Note that the oleo has an internal metal reinforcement and there is a limit to how deeply one can drill.
The tail planes are of very thin section. They were fitted in place and then the upper and lower struts added. A tiny link to the trim tab on the rudder was gently fixed. The propeller comes as three separate blades and a spinner. These are gently assembled into one piece and a hole was drilled deep enough to fit the spinner onto the propeller shaft.
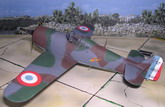
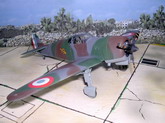
Paintwork
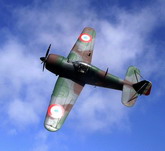
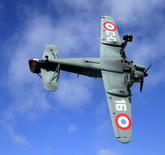
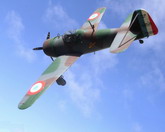
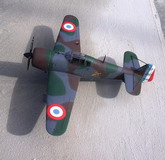
The colour box art shows the aircraft to good effect, giving a clue to the shades of the three-tone colour camouflage of brown, medium green and blue grey upper surfaces and medium grey to the lower surfaces. The pattern of the camouflage is also given in the instructions. The kit was airbrushed in the respective colours using Modelmaster brand of paint. It was then given a coat of Klear, decals applied and finally given an overall coat of semi matt varnish.
Conclusion
The kit builds into a very pleasing model and should appeal to modellers keen on French fighters or to those interested on little known types, it is also a change from the long list of Bf 109s and FW 190s. I highly recommend the kit to those who work with resin.
Carmel J Attard
Click on
images below to see larger images
|
|