|

Lockheed Hercules C-130H-30
History
The badly replacement of ageing Hastings and Beverley transport aircraft gave rise for a decision by the RAF to order 66 aircraft known as C-130K. Further more in order to cater for the requirement in the Royal Air Force the Lockheed Company have modified Hercules C-130K XV223 to form the prototype Hercules C Mk3 and this made first flight on the 3rd of December 1979. The fuselage was stretched by 15 feet in order to increase capacity from 92 to 129 infantrymen or from 64 to 92 paratroopers. There were 29 other Hercules C Mk1s, which were modified to Mk3 standard by Marshall of Cambridge who completed the modification programme in November 1985. Commencing during the following year C Mk3s (XV176/177, 183/184, 188/190, 193, 197,199, 202, 207, 209, 212, 214, 217, 219/223, 290,249, 200, 301/305 and 307 were all fitted with the air refuelling probe as Hercules C Mk3Ps.
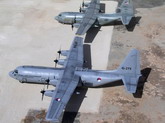
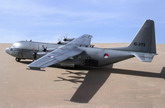
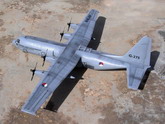
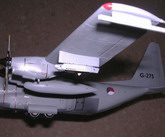
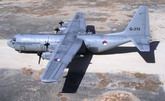
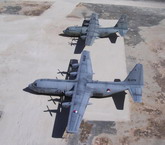
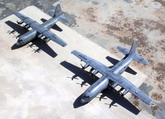
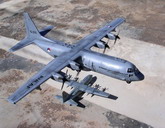
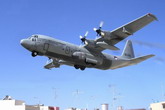
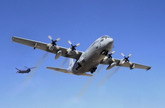
Several air forces around the world received the stretched version of the Hercules. Among there were the air forces of Canada, Algeria, Zaire, Spain, Portugal, and Kuwait, Malaysia, Saudi Arabia, Holland etc. Dutch Air Force has two C-130H-30 Hercules aircraft, these bear the names Ben Swagerman (G-273) and Joop Mulder (G-275), which are assigned to 336 Squadron at Eindhoven Air Base. There was also the civil version of the stretched Hercules known as L-100-20 and L-100-30. The difference between the latter two is in the difference of length of stretch in fuselage sections at forward and aft sections. The L-100-20 had shorter stretch lengths.
The Kit
Make: Airfix Hercules and Airmodel AM-59
Scale: 1/72
Notes: Conversion kit with Flevo Decals FD72-008
Cost: Kit 20Euro, AM-59 10Euro, DecalFD72-008 16 Euro
The early Airfix kit was used for this modification. Besides, there are at the moment two more kits at 1/72 scale, which can just as easily be converted to C-130H-30 by ESCI and Italeri. I have favoured in building a Dutch aircraft being aware of a recently release of FLEVO DECALS FD-72-008 which contains complete sets of decals for a C-130H and a C-130H-30 Hercules which also includes the minute stencil instructions printed on the aircraft.
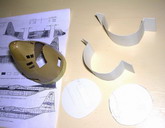
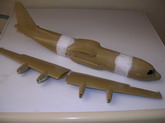
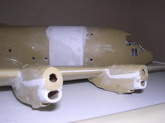
Using the early Airfix kit or the reboxed kit C-130E/H that is practically the same Italeri E/H, this is not entirely correct for a C-130H. The C-130H has an APU in the left main landing gear spons. Because of this the gear sponses on both sides are larger. On the right side of the C-130H are different air-cooling intakes while the C-130E (Airfix kit) has the triangular shaped NACA air intakes. The C-130H has an air scoop n the outside of the airframe on forward fuselage section. There is an air scoop on the front of the main landing gear. After modifying the kit into a true H version the next step was to stretch the fuselage to produce a C-130H-30 version. There are three ways to go about it. One can opt to use the stretch pieces from an old scrapped C-130 fuselage. If you have an old scrapped C-130 do not throw it away. A second method is to use the ‘Flightpath’ conversion set, which consists of a forward and aft resin plug to stretch the fuselage to the correct length. Being a resin conversion kit this may prove to be pricey. It can be ordered directly from their site
www.djparkins.com. Lastly one can go about lengthening the fuselage utilising the vac form plastic plugs provided by AM-59 set. This Airmodel conversion set has the great advantage as it is relatively less expensive and also has parts for no less than 13 different C-130 versions. So far I have used this set to make a JC-130A besides the plugs for the C-130H-30. This can be obtained from
www.airmodel.de.
|
Click on
images below to see larger images
|
|
|
Applying plugs from AM-59 set is easier than any modellers imagine. Anyone with average skill and experience can complete this job successfully and the end result will be very pleasing. The plugs are made of soft white plastic and needs to be reinforced effectively to avoid disappointments at a later stage and experience cracking at joining areas.
The kit fuselage is first cut in two places. A masking tape wrapped around each fuselage section will serve as a guide during cutting. For the front plug the fuselage is cut straight along a panel line located next to the front porthole. This plug is 35.2 mm long. The rear extension can be obtained in same way and its length now must be 28.2mm. The
vac-form plugs are first cut to the required lengths, smoothened at the joints, each half glued together to form the same circumference as the C-130 kit fuselage section diameter. The two plugs are each reinforced with cross bulkheads and longitudinal brackets. One can use balsa wood inserted in the plugs as an alternative method and I went for the first one. The assembly of the kit then followed the instructions…. building the cockpit, install body gear wells and apply the conversion details mentioned earlier. When it comes to insert the plugs, a steel rule is used to check the alignment of the section to ensure that the plugs are properly aligned and permanently glued. A small amount of filler will be required followed by smooth sanding at the joining areas. Ample of time was allowed to set and obtain a strong long fuselage. Having said that the rest of assembly is that of a standard kit. Extra work to follow was detailing the forward wheel well and main well, reshaping top and bottom Pinocchio nose of the Airfix kit, reshape rear of tail plane bringing it shorter by 1/16”, add two port holes each side of the fuselage, blank sponsor intakes, extend front of sponsors by ½” and add sponsor air intake to front. These were all scratch built items making reference to photos. All panel lines on all wings were scribed since the ones on the kit were all raised type.
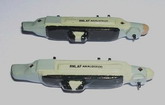
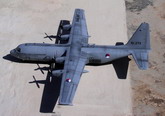
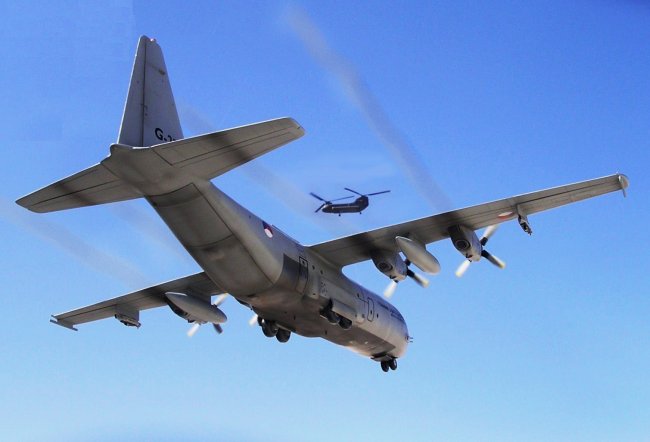
A countermeasures pod designed to provide full dimensional protection against radar directed weapons was added under the outer wing pylons. The pod provides self protection jamming against pulse doppler or The AN/ALQ-131, originally developed by Westinghouse, is an external electronic CW jamming threats. The ALQ-131 accomplishes this by responding with a combination of noise, repeater or transponder electronic jamming techniques. The pod weighs 600 pounds, with modular design for multiple frequency band capability. It has an ability to be quickly re-programmed against changing threats.
Although no longer in production, the AN/ALQ-131 is still operational on A-10, F-16 and C-130 aircraft in the US Air Force and 11 other countries. With More than 1,600 units produced, it is one of the most successful ECM systems ever built. Operational Flight Program
(OFP) Block software up-dates are expected about every two years, or as tactically required based on the continuum of threat evaluation to support theater tailored User Data Files
(UDF), and jammer technique optimization. The AN/ALQ-131 is gradually being replaced by the more modern ITT AN/ALQ-211
jammer. One can get a couple of these pods from any A-10 or F-16 kit and fix it under wings. I preferred to scratch build mine, as I had none readily available.
Colour and markings.
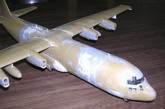
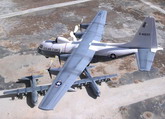
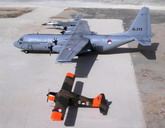
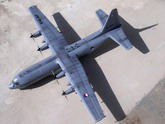
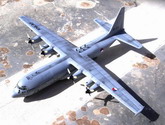
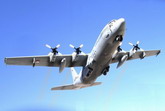
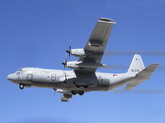
The R Netherlands A.F. Lockheed C-130H-30 Hercules of 336 squadron could be assembled as G-275 ‘Joop
Mulder’ or as G-273 ‘Ben Swagerman’. Both landed at Hal-Luqa airfield, Malta on occasions during the past years. The aircraft was finished in overall mid gray MM FS 36375 (light Gull Gray). This also had a dark gray protective coating on the underside of the aircraft and runs up to the front fuselage. The overall gray varied in different tints from the weather. Both versions of the Dutch Hercules have been seen flying with the Electronic Countermeasure Pods AN/ALQ-131. These were light gull gray FS 36440 with an off-white or medium–gray nose. Engine air intakes were silver, prop spinners were black and the blades were a mix of silver and gray with a small band on blade in light ghost gray. Prop tips were insignia yellow FS 33538. The wings walkways were given a slightly darker shad of
grey. In the end the completed model was given two coats of Klear (Future). After applying decals the completed model was given a semi flat coat of Model Master lacquer.
Conclusion
This was another big project I enjoyed building. I used parts such as the twin
dorsal antennae which I acquired from the Revell C-130J that were surplus, so
never throw away such items. I have now the longest kit in my collection;
fitting in existing showcase is another thing. The same method can also be used
to produce a C-130J-30 Hercules, the one with 6-bladed prop using the Revell
C-130J kit.
Carmel J Attard
|
Click on
images below to see larger images
|
|
|
|
|
|