|
1/48 Eduard Fokker Dr.I (weekend Edition, ref 8490)
Not the first time I dare with a model of the World War I, as I walked in time to a biplane, Eduard also, and I was not at all satisfied of the work done.
In a first look at this beautiful triplane, we see good detail both outside and inside, not to be needed in my opinion any gravure or aftermarket for improvement. You have to plan
the assembly and painting process carefully, because if you assemble the whole model before painting, and
you would run the risk of not getting to paint certain areas.
The illustration provided by Eduard, is very attractive, and you have to be clear about what you want to do, and
you can destroy the work done to try to redo or modify the scheme.
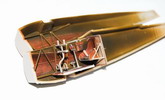
We begin, of course, cutting up and cleaning parts, and went to paint and assemble inside. Here it should be noted that
I only applied in oil to simulate the look of wood, in a very simple, and we painted the work with a clear color to be possible and then apply a bit of oil at one end. Then with a stiff flat brush, we extend in a direction oil, to achieve the desired effect. This technique, also applied on the
seat and floor.
Only necessary to consider letting well anchored two U-shaped pieces that are at the top and forwardly of the cab, which is where the guns rest and which can spoil the alignment of the same if not stick conditions.
For the pilots seat I used a piece of masking tape to simulate painted belts. In this section we can find out the historical context metallic
seatbelt, but when evaluating how to make the rings and they will come out of scale, I chose to paint the ends of the aluminum tape.
After closing the fuselage, which fits beautifully, we find that it provides an elongated piece would go in the bottom of the fuselage to mimic the seams of the fabric, and then to accept the advice of fellow Rafa Navarro, I chose to make away that piece (and embutiéndola sanding on the fuselage) and copper wire simulating these seams.
To do this process, I only had to wind the copper wire into a needle, then pulling, stretching and flattening to achieve the desired effect (I must say that of course did not go to the first).
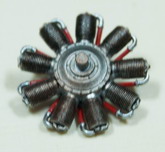
Step-assemble the center wing, as it is essential to close holes in the front of the fuselage before going to paint.
|
Click on
images below to see larger images
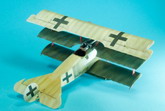
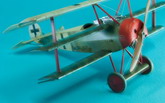
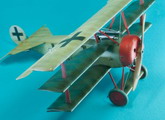
|
|
|
Painting
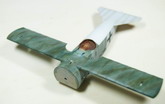
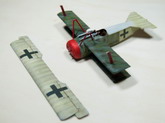
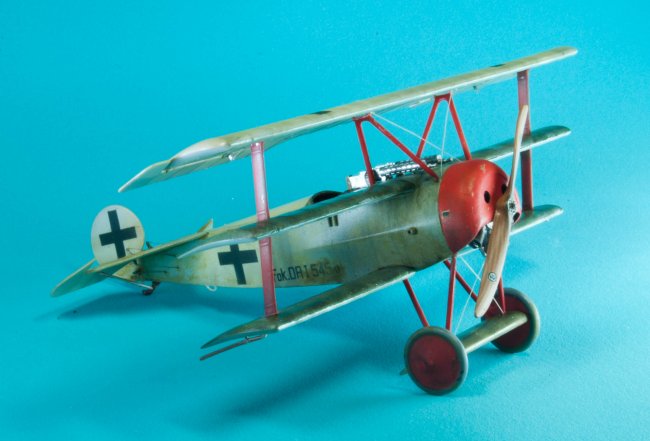
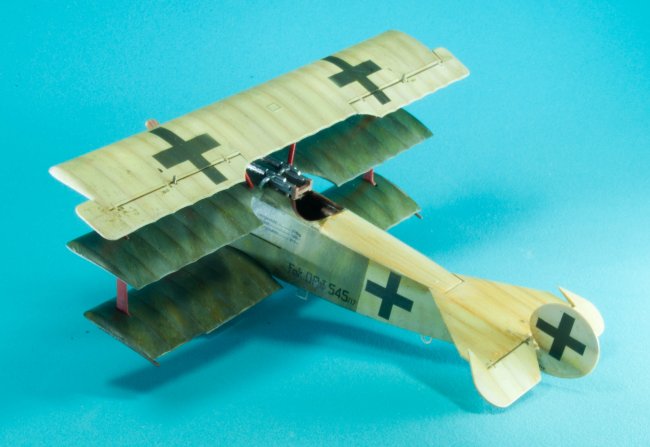
We turn to the painting phase. The scheme has three distinct parts. A white portion on the upper wing and rear half of the plane, reaching the target to the rear cabin hole in its top. A blue in the lower part and finally in the middle of the sides and the top of the middle and lower wings, a painting stripes in two shades of green, gray background.
Started giving some dark shades intercostillares staves alternatively wings, in order to make them stand whenever give paint.
Then we went to the paint to scratches that has been done dry brush. I started giving a yellow base on the fuselage that goes along with the pilot, and gray on the other to the motor, the two quite diluted, and then passed to give dry brush, with green and with undiluted paint. Earlier he had done several tests with different bristle brushes both hard and soft, until you play the width you want, decantándome by those with soft bristles as hard bristles can paint clumping which distort the effect one Once dry and had even raised areas where the primer, even without applying force to the brush.
But ...., was not as I wanted, so despinté and gave it a good coat of gray, somewhat less diluted, achieving an effect that I liked more. The same operation the di in the wings, but without the first step, and these areas became obliquely.
Finally, very dilute gray airbrushed the sides to lessen the effect.
The crosses were made with templates, fotocopiándolas adhesive masking paper, and then cutting them.
Once finished, matt varnish applied, and went on to give oils to mess quite the model, as pictured to the incidence own German soil fields full of mud. This process did before mounting, to work better areas, leaving some retouching when it was fully assembled.
Final assembly and detail.
I do not recommend (if you have big hands like me), ride the moving parts of the tail, and that having to work on the demo "upside down" in subsequent processes, are going to release, as it happened.
I turn now to mount machine guns, it has been the most troublesome of the whole model, which again I say usually I was surprised by how well he has fitted and the parts have gone to your site.
This pair of guns carried on one side and on the other charger output tube pods bullets, so the studs are mounted on commenting that I mentioned mounting the cab and rely on a small lump on the fuselage to help us align. These arms are attached by a piece that we have to paint wood, and I recommend them to join and settled once mounted on the fuselage. Also, the machine gun on the right (as you look toward the front of the model) is the charger that fits into a hole in the fuselage, you need to tweak so that once painted between smoothly.
Finally, I went to mount the upper wing and the frame where the wheels are supported, which has left me quite impressed, not to mount it give me any problems.
Finally, some oils, and pilot mounting brackets and two coming in the back to move the plane. Varnish, and finally mounting struts between the upper wing and the core and between the lower frame and the wheels, and the wiring of the moving parts.
Final consideration.
Overall, I have to give him a high enough rating to the model itself and its assembly, but takes more work than a monoplane ... or is it because I'm more used to perform them.
I hope you liked it.
Saludos desde España...
Juan Jesús Moreno
|
Click on
images below to see larger images
|
|
|
|
|
|