|
The Skyraider Part 5
or 6
Preface:
All my Skyraider models share a few common traits. All of them (except the AD-6 & AD-5W, which were unarmed) have gun barrels & pitot tubes made from hypodermic needles. All were painted with Testor’s Model Master or Tamiya acrylics and weathered with oils. I also used AK Interactive washes to replicate the always present oil and fuel stains on this dirty bird. Aerials were created with EZ Line strands. Beyond that I used a variety of aftermarket parts & decals as described in each model’s individual article.
A word about the Tamiya kit…wonderful! Goes together without any drama and is very nicely detailed straight out of the box. But like any kit…there’s room for improvement!
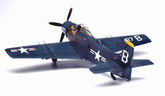
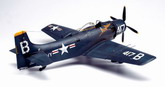
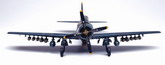
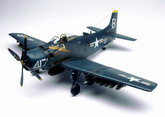
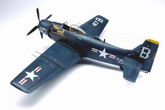
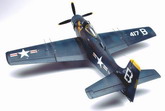
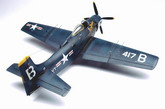
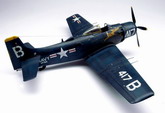
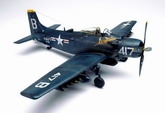
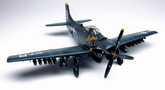
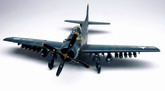
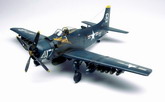
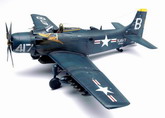
One of the markings depicted in the Cutting Edge set was that of a US Navy AD-4NA, which was the night attack version of the Skyraider. It is considerably more colorful than my earlier Marine bird, and a version I wanted to build. The most significant difference between the AD-6 and this plane are the two “car doors” on the sides of the aircraft, which allowed access to the compartment where the radar operators sat. A small air scoop topped the fuselage, used to cool the radar operator’s compartment. This plane had the side speed brakes deleted, armor removed (most of them), and many had flash hiders on the guns. CE used to make a resin fuselage conversion, but I was unsuccessful in finding one. However, I managed to obtain at reasonable cost the Cutting Edge AD-4W Guppy conversion, which had resin car doors and the air scoop. The scoop is not used on the AD-4W and was included because it is on the same sprue as the early weapons mounts needed for the AEW bird. I planned on using the AEW parts on a later conversion.
The AD-4N was the night attack version of the Skyraider. The two "car doors" on the rear fuselage of the aircraft were access for a small two-man compartment which housed the radar operators. However, these particular planes were used in the conventional day attack mission, with all internal radar compartment gear removed. Only the doors remained as a sign of their former use.
|
Click on
images below to see larger images
|
|
|
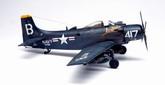
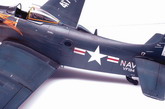
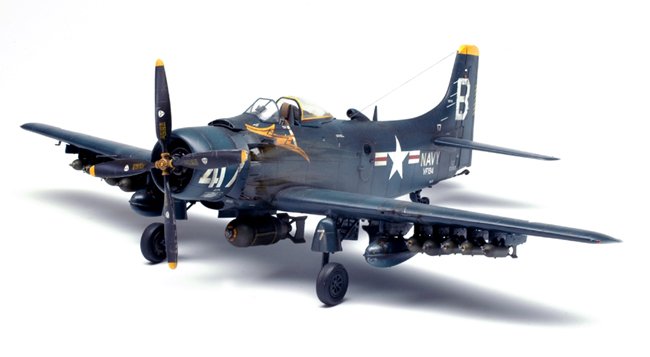
I began again by sanding off the armor plates and rescribing panel lines. I filled the side speed brakes and filled & sanded the panel lines in that area, which are quite different from the AD-6. I puzzled over the car doors and decided to try to cut out the openings on the port side fuselage and use the Cutting Edge resin parts…DISASTER!! The parts fit very poorly, mainly because I had no guide to cut the openings, and quite frankly, looked like crap. I was dejected…until I found a photo etch set from Airwaves which had parts for the car doors depicted in very thin brass. Luckily I had an extra A-1H fuselage, so I took those parts, once again sanding and re-scribing (the right side of the fuse was still untouched). I applied the PE parts, sanding and blending, and got an acceptable look. They stand very slightly proud of the fuselage, but it looked OK to me.
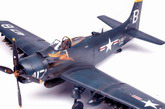
This plane does not show the extensive wear of my other "blue bird", the USMC AD-4, as these carrier based aircraft were much more carefully maintained then their ground based counterparts. I used varying tones of Dark Sea Blue to add depth and interest to an otherwise monotone scheme.
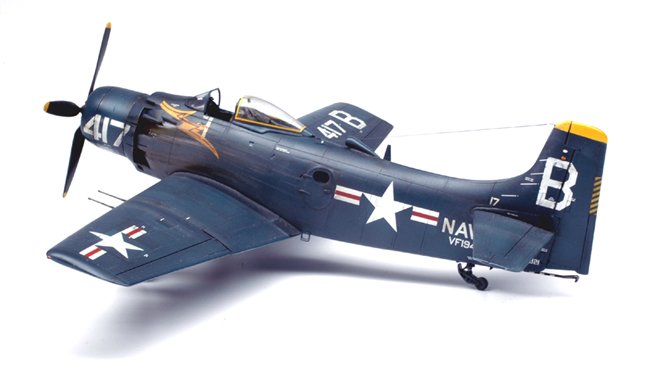
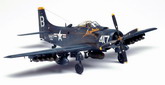
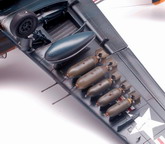
I had at some point bought an old resin detail set from KMC, designed to update the Monogram kit, but it had some neat parts, including a very nice early version cockpit. I modified it slightly to fit the Tamiya hull by using the plastic rear cockpit wall. I added a Quickboost canvas cover behind the canopy. The defining features of the AD-4N, the "car doors" and fuselage air scoop, can be seen to great advantage here. Backdating this model requires careful removing of the raised armor panels on the fuselage and bottom wing, rudder beacon, and most antennas. Much else remained the same through the life of the 'Raider. Armament consists of the AWESOME Eduard 500 & 250 lb bomb sets, which include resin, PE and decals. The early version WWII style fuel tanks came from the Verlinden Mustang update set and are actually a mismatched pair, depicting the chaotic supply situation of the Korea War. The Tamiya kit supplied the centerline 1000 lb bomb, with added lead foil straps. I located some brass 20mm gun barrels from RB Models, which are actually for some Japanese plane, but are a close match for the ‘Raider guns with the flash hiders. And I didn’t have to cut any hypo needles! This bird was a carrier based Navy craft, and these were typically better maintained than the Marine ground based Spads during the Korean War. Again I started by base coating in Tamiya primer and pre-shading, and I followed this with a coat of MM Gloss Dark Sea Blue. I post shaded but kept it to a minimum. The CE decals went on fine and were an interesting contrast to the dirtier USMC Sandy I had built earlier. I can’t leave any model too shiny, but used Testors Semi Gloss to add some shine. More exhaust shading followed and my Navy night hunter was complete.
Next up…my most extensive conversion of the Tamiya kit yet…and we will search the skies!
Vince Pedulla
ModelerV Studios
|
Click on
images below to see larger images
|
|
|
|
|
|